Showing posts with label crafts. Show all posts

Shabby Chic Heart Bowl Fillers - DIY No Sewing!


For me, nothing's better than a fast, easy and inexpensive craft project. These shabby chic heart bowl fillers check all the right boxes. All you need to make these is some leftover fabric or drop cloth, scissors, a glue gun and (if you like) stencils and transfers.


Check out my Youtube video to see more of these hearts up close and personal, and learn how you can make some for yourself.

Creating a Christmas Cloche with Mostly Things I Had on Hand


Back in the day when I worked at Pier 1, I bought a candle cloche that was on clearance. I've never used it for burning candles, and for the most part it's been squirreled away in my kitchen cabinet. Last week, while gathering my Christmas decor, I spied the cloche and had an idea to repurpose it into a Christmas cloche.

Thrifted Crate Flipped for Fall


Today I'm sharing a thrift flip with you. And honestly, I'm kind of excited about the way it turned out. It's something that can be displayed throughout the year, and right now it's styled for fall.


A while ago I bought a small crate for $2 at the thrift store. It apparently had been used as a wall shelf with little cup hooks attached (one was missing).

Wall Pocket Redo and Another Home Project


Lately my mind has been flooded with ideas for wall decor. I think it started with the budget-friendly wall decor with a vintage vibe that I blogged about several weeks ago. I had so much fun making that piece that it has inspired me to do more.


Last weekend I started another home painting project (which I'll tell you about later in this post), and while waiting for coats of paint to dry I worked on a quick wall pocket redo.

Spring Vignette in the Living Room


I wanted to add a little spring decor in my living room without spending much money. So, I shopped my home and came up with a pleasing spring vignette.

Vintage Christmas Carols Vignette


Greetings Cottage Friends,


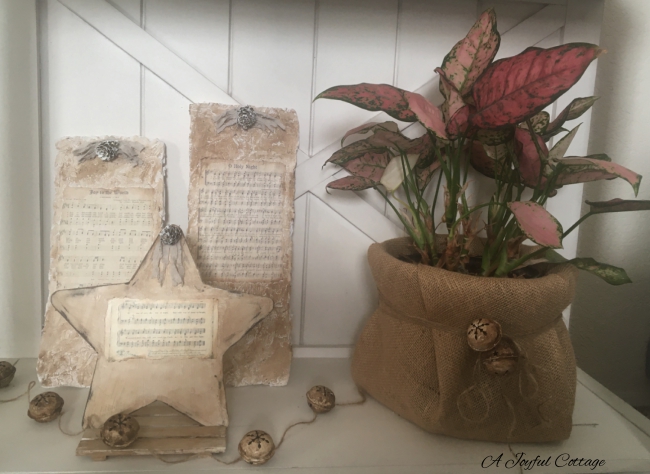
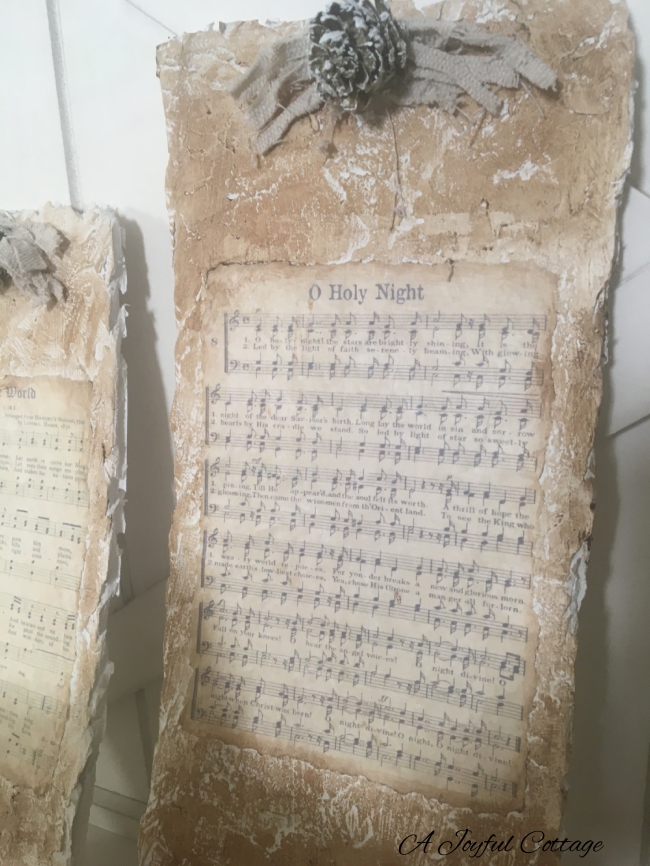
Christmas decorating is complete at A Joyful Cottage, and I'm happy to share my final 2021 Christmas craft with you. I think of all my Christmas crafts this year, this particular one is my favorite. It combines all the things I love: texturizing, painting and decoupage.


I used leftover foam board from the faux architectural salvage pieces to make the backboards and painted them with Rustoleum Linen White chalk paint. The sheet music is free printables I found on the internet. 


An application of Waverly Antique Wax over the pieces helped to give them an aged look.


The star and the mini pallet it sits on came from Dollar Tree. I used scraps of drop cloth and little Dollar Tree pine cones, dry brushed with chalk paint, to trim each piece.


Another easy to accomplish, wallet-friendly Christmas craft. It doesn't get better than that.


How are your Christmas preparations coming along? 


Hugs,


Easy Christmas Decor Craft - Paper Bag Snowflakes Tutorial


Howdy-doo Cottage Friends,

I've mentioned previously that I'm a bit of a Youtube junkie. I just can't seem to help myself. . .I can view everything from pastoral messages to crafting, and many topics in between --  all for free. When I came across the making of paper bag snowflakes on one of my favorite DIY channels, I did a happy dance. Now maybe you're familiar with this craft, as I think it's actually been around for awhile. But I had never seen it until yesterday. I knew immediately I had to try it. And now I'm going to share it with you, because I think you might want to try it, as well.

DIY Budget-Friendly Wall Decor - How A Discarded Cabinet Door Became A French Country Sign


This week I'm taking some time off from work; a staycation meant to give me a chance to kick back, have some fun, and enjoy the freedom of deciding myself what I want to do with these ten days. Yes! Ten days. One of the things I chose to do was create wall decor for a space between my two living room windows, just above my TV screen. 

My Lime Green Frame Thingy Makeover (Or How I Made a Valentine Wall Hanging)


Welcome Cottage Friends! 

Earlier this month I shared with you my mega thrift store haul.


The lime green frame thingy with chicken wire was, in my opinion, a real sleeper. Kind of funky, but I could see it had potential for a crafty project. Especially at the meager price of $1, what did I have to lose?


I really do have a thing for chicken wire. After all, when I designed our cottage kitchen in Oregon, I made sure the glass cabinets included chicken wire. The cabinet maker installed the wire between two pieces of glass to make it easy for me to clean. Practical, as well as charming. Brilliant.


With Valentine's Day just around the corner, I thought it would be fun to transform my lime green frame thingy with the chicken wire into a Valentine wall hanging.

I picked up a pack of willow hearts at The Dollar Tree, and a roll of linen-like ribbon at Wal-Mart, along with a bunch of faux lavender and ivory chalk paint. Everything else I already had in my craft stash.


Then I got to work painting over the crazy lime green. I originally thought I might distress the edges, so I covered them with brown paint. I also took a few minutes to put a coat of burnt umber craft paint on the new chicken wire to give it an aged look. 


It took two coats of paint to cover the lime green. I liked the end result and decided not to do any distressing. 

I wrapped the bottom of the lavender with jute, 


and glued the hearts to the ribbon.


Since all the individual elements are tied to the frame and not glued, I can always use this ivory frame with chicken wire for another project.


So, there you have it. A charming wall hanging for just a few dollars and very little work. 

Have you ever found a "sleeper" at a thrift store that you transformed into something new?

"So now faith, hope, and love abide, these three but the greatest of these is love." 1 Corinthians 13:13

Hugs,


Cottage Life - Welcoming March

March has arrived after February's major mood swing. I snapped this photo yesterday of a little boy hitchhiking a ride on his dad's shoulders during a snowstorm. 


After several inches of snow fell, the temperatures rose and the melting commenced once more.

This is my garden this morning, which is pretty much the way it looked before two snowstorms passed through the last two days of February.


I noticed a couple of days ago that crocuses and daffodils are peeking through the snow, and that makes me happy.

My decluttering adventure continues with periodic breaks for rug making and normal life activities, like grocery shopping and running errands.

Here's my rug so far.


I really want to get it finished and off the loom so I can start on some collages for the Spring Fling 2017 I'm organizing. It will take place on April 8. This is an artisan/craft fair, similar to the Holiday Bazaar I participated in last December. Since there are no spring events like this in our community, I decided to start one. Fortunately, I've received lots of support from others who have planned similar affairs, and their shared experience is a big help.

As I mentioned, I have managed to get more decluttering done. I went through all my magazines and gave away about 30 to friends who will enjoy them and pass them along. I saved only a few of my favorites, which are kept by my chair in the sitting room. 


Next on my list is papers, a suspected time-consuming chore. I skipped over that and went to my makeup bag, which I knew would be an altogether easier, albeit much needed, task.

I dumped out everything in the bag.


Honestly, I was kind of shocked at what I found in there. Just keeping it real here, but there were old broken compacts and stray mirrors, lots of makeup I purchased years ago and didn't like, brushes I never use, and even an old rubber band (good grief!).

After sorting through it all I came to realize I have 7 makeup essentials.


Mascara, eyebrow pencil (and sharpener), concealer, liquid foundation, bronzer (I mix a little with my foundation in the summer), blush stick and lip gloss.
That's it!

I don't need all that other paraphenalia. These are products that work for me and I can let go of all that other stuff knowing that from here on out I'll use up what I already have, and I'll buy only what I need, when I need it.

This is what I discarded.


Everything else fits into a clear bag my dentist gave me at my last visit. (I like that I can see what's inside.)


This fits easily into our bathroom cabinet and when packing for a trip I can just throw it into my carrying bag. Easy peasy. 

I really believe I kept all that other makeup out of guilt; feeling if I had made the purchase, I needed to hold on to it. That's just silly. I've learned from my mistakes and I can move on knowing I'll make wiser decisions going forward.

Oh, I did find in my before pile a nail file and comb that will go to homes of their own within our cottage. This is part of organizing like items in one place.


I am feeling so good about even the smallest decluttering I accomplish. Somehow it's energizing and it inspires me to do more. It's actually a joyful undertaking.


A Heart for Pastel

About a month ago I found this easel-hook-stand-thingy at a thrift store for 50 cents. I didn't have any idea how I would use it, but it was just too cute (and too inexpensive) to pass up. 


It occurred to me a few days ago that with Valentine's Day just around the corner I could hang a heart from the stand's hook.


So, from my stash of fabrics and lace, buttons and such, I made this heart today. The stitched "Love" is my first stab at hand embroidery (no pun intended).


Now I have a pretty little Valentine decoration for mere pennies.

I like that.


Have you ever bought something at a thrift store that you just couldn't pass up even though you didn't know what you'd do with it?


French Inspired Altered Clipboard


Bonjour les amis de chalets (Hello cottage friends),

Can you tell I'm feeling a little French today?  The reason lies with the lovely French mademoiselle on my altered clipboard.  She's patiently waited three months for me to embellish her. 

Right after I finished the French Script Bottle I found an old clipboard for 25 cents at a thrift store.  It was in the spring, and the song April in Paris was playing in my head.  I knew this was a sign for me to do another French Script Mod Podge project. 


I downloaded French Sheet Music and Antique Paris Fashion printables from The Graphics Fairy and did my Mod Podge thing.  I painted the clip a soft green, but I didn't like it, so I repainted it in ivory and I didn't like that either.  So, in my typical I'll-wait-until-I-feel-inspired-again fashion, I set Mademoiselle Clipboard aside. 


In the meantime I had collected some odds and ends for crafting -- a little doily, a baby food jar filled with old buttons -- all found at thrift stores (I'm frugal like that) -- and I dried some pink carnations (I'm frugal like that, too). 

Inspiration hit Sunday afternoon.


I like the way Mademoiselle Clipboard turned out.  A little shabby chique using crafty things I had on hand.


This project took about an hour to complete, start to finish.  I like that.    How much time do you like to spend on a project?


I like to party at these lovely blogs: 
My Show and Share Party


Ivy and ElephantsI would love to have you join me for my link party, Share Your Cup!button
PhotobucketgiveawaysFeathered Nest Friday


Craft Dictator