Last week, during my staycation, I came across a new store that caught my eye. I was on my way to a consignment store to do some browsing when I drove by a rather large shop called Cozy Cottage & Co.. I did a quick turn around and pulled into the parking lot. In my book, any store with a name like that deserves a visit.
Showing posts with label vintage. Show all posts
My Imperfectly Perfect Dining Table and Chairs
Sunday, June 5, 2022
One of the first purchases I made when I moved into my home two years ago was my dining table. I wanted something with a French country vibe, and it had to be priced in my budget. Fortunately, while browsing in Habitat Restore I spied a unique table that peeked my interest. I wasn't in love with the parquet top, but it did have two inset draw leafs that extend to allow for 8 - 10 people. In my small space, that was a definite plus. What really sold me, though, was the price tag of $75. Definitely within my budget.
Labels:
cottage kitchen,
French Country,
vintage
$3 Vintage Suitcase Makeover
Thursday, June 26, 2014
I scored a vintage suitcase last weekend for $3 at a Vintage Garage Sale. Mr. Suitcase, in my opinion, looked too much shabby and not enough chic when I found him.
He had a black eye.
A lot of age spots. And I thought maybe he'd spent some nights out in the rain without an umbrella.
I noticed a couple of scars; like Mr. Suitcase had been in a sword fight.
He had great bones, though. And I liked his taste in jewelry -- that worn, rusty look. Not to mention that sassy lucite plastic nose ring. I mean, really. This guy was sending me serious vintage 40's vibes. For $3 I didn't think twice. I knew I could put him in rehab.
My friend Robin suggested I cover up his age spots with wood stain.
I liked that idea and figured I didn't have much to lose. At the very worst, if it didn't work, Mr. Suitcase would end up under the bed as storage. (I kept that little back-up plan from Mr. Suitcase, though. He's very sensitive.)
I borrowed Captain's Minwax wood stain and gave Mr. Suitcase a makeover, covering his scar with little dabs of black and brown permanent markers Captain had on hand.
Now I love the way Mr. Suitcase looks. Rugged, with a sort of edgy patina.
It's fun to see an idea come to life. What are you imagining today?
I'm sharing at these lovely parties:
Amaze Me Monday at Dwellings
Tweak It Tuesday at Cozy Little House
You're Gonna Love it Tuesday at Kathe with an E
Nifty Thrifty Tuesday at Coastal Charm
Share Your Cup at Have a Daily Cup of Mrs. OlsonWow Us Wednesday at Savvy Southern Style
What we Accomplished Wednesday at Green Willow Pond
Home and Garden Thursday at A Delightsome Life
The Scoop at Stone Gable
Home Sweet Home at The Charm of Home
Shabbilicious Friday at Shabby Art Boutique
The Best DIY Link Party
Feathered Nest Friday at French Country Cottage
Frugal Friday at The Shabby Nest
Craft Frenzy Friday at Craft Dictator
A Bit of Vintage - Quilt Progress
Thursday, June 5, 2014
Welcome Cottage Friends.
In April I shared the completion of my first quilt, and the beginning of my second quilt.
At the time of that post I had the pieces ready to sew into blocks. For this quilt I'm using the Lario 3 Sisters Layer Cake by Moda.
This is a very easy pattern; I finished the blocks in 2 days. Moving the blocks around until I have the design I want is very satisfying. At this point I see the quilt top coming together and a sense of accomplishment follows.
In May I gathered with my crafty friends for Ladies Day Out, and joined the blocks into rows.
This week we met again and I added the borders.
And here's the finished quilt top. I'm in love with this vintage look.
Home and Garden Thursday at A Delightsome Life
Share Your Cup Thursday at Have a Daily Cup of Mrs. Olson
Home Sweet Home at The Charm of Home
Feathered Nest Friday at French Country Cottage
In April I shared the completion of my first quilt, and the beginning of my second quilt.
At the time of that post I had the pieces ready to sew into blocks. For this quilt I'm using the Lario 3 Sisters Layer Cake by Moda.
This is a very easy pattern; I finished the blocks in 2 days. Moving the blocks around until I have the design I want is very satisfying. At this point I see the quilt top coming together and a sense of accomplishment follows.
In May I gathered with my crafty friends for Ladies Day Out, and joined the blocks into rows.
This week we met again and I added the borders.
And here's the finished quilt top. I'm in love with this vintage look.
Now it's off to the quilt shop for the backing fabric.
What are you working on this week?
I'm sharing at these lovely parties:
Amaze Me Monday at Dwellings
Tweak it Tuesday at Cozy Little House
You're Gonna Love it Tuesday at Kathe with an E
Wow Us Wednesday at Savvy Southern StyleHome and Garden Thursday at A Delightsome Life
Share Your Cup Thursday at Have a Daily Cup of Mrs. Olson
Home Sweet Home at The Charm of Home
Feathered Nest Friday at French Country Cottage
Mixing Vintage and Modern
Tuesday, March 4, 2014
Hello Cottage Friends!
Thanks for stopping by today. I hope those of you who have been under the weather are feeling better.
Well, I have some exciting news. . .
We are officially in escrow on a lot, and we're planning to build our own cottage.
Can you believe it?
I'm pretty stunned, actually. As plans unfold (no pun intended), I'll share more details with you.
For now let's talk about decorating a home with old and new; mixing vintage and modern pieces. And by "modern" I mean:
belonging to present day:
relating or belonging to the present period in history.
Here's an example of what I'm talking about.
This is a section of our living room. It's where I like to relax after a hard day of blogging, reading blogs, linking up, pinning. . .(it's dirty work, but someone has to do it). Okay, ignore the oh-so-attractive red flashlight on the chest in the background. Captain thinks we need it there in case we ever lose power. I should have taken this shot over without the red intruder, but I didn't. There, I've said it.
I've shown my chair before, but let's take a closer look.
It's a recent purchase, manufactured by Lane in a custom fabric. I chose this particular chair because it's extremely comfortable, it reclines, it was moderately priced, and in this fabric it looks less contemporary and more "vintage".
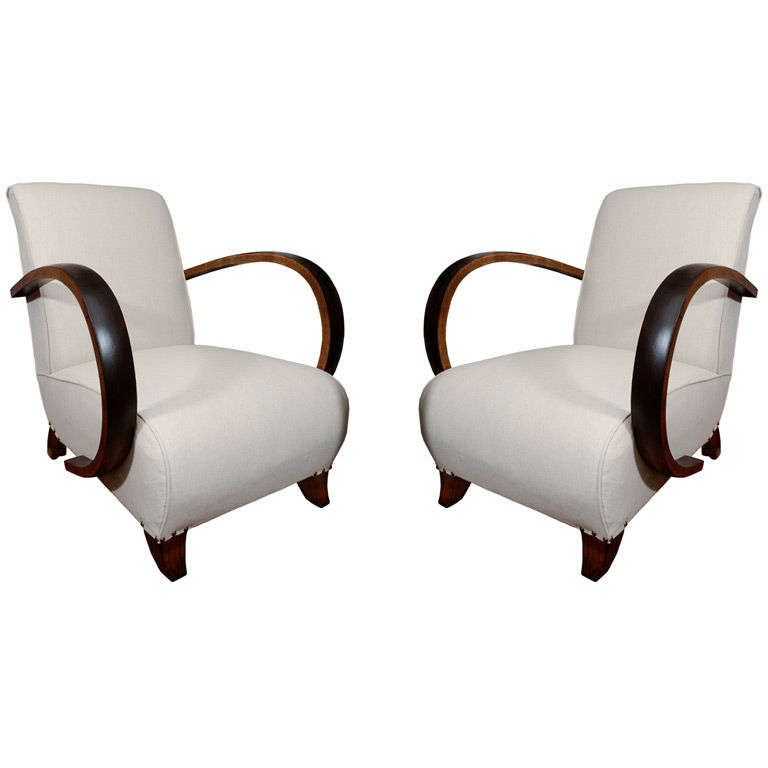
The style is reminiscent of these French hoop arm chairs from the 1930's.
![]() |
| Source: 1stDibs |
I paired it with this end table. . .
Which was a yard sale find. It came home in an atrocious coat of black paint, with that sassy green knob. Some day I'll share the whole story of how I gave the table new life in Pumpkin Stem green.
But I regress.
So, the fabric has a hint of green.
And khaki, and a beautiful deep berry.
Which leads me to the table top, where all the fun happens as I pick up colors from the fabric.
The base on the lamp (a Target purchase) matches the red in the fabric, and the wood of the chair arms. It has the vintage look I love, and the pretty shade is in the same color family as the vintage painted tray that holds all my pretties. . .
Modern cut glass vase and tea light holder have vintage appeal, and hold berry accents.
And my vintage books repeat the colors in the chair fabric. The bookends are new.
That's how my vintage and modern pieces play nice together.
Did you mix styles at all? Or do you pretty much stick to one period?
P.S. Don't forget to link up your master bedroom posts at Every Room In The House if you haven't yet done so. We're partying in the Master Bedroom all month long. Can't wait to see what you share.
Labels:
design inspiration,
living room,
modern,
vintage
Vintage Table Makeover
Wednesday, September 25, 2013
We've been in our rented apartment for about a month now, and I've been happily working on making a nest here. When we sold our Colorado home we gave away 90% of our furnishings, so now I'm bargain hunting, and giving new life to old furniture. My first project was this vintage table turned desk that now graces my home office/studio. Miss V.T. and I met at one of my favorite home shops. She sat forlornly in the bargain shed without a price tag. The shop owner and I settled on a price of $50 and she was delivered the next day. Here she is after I gave her a bath to get rid of all the dirt and cobwebs. Still pretty rough, and some might think I paid too much for her, but she's a sturdy gal with great bones, and exactly what I've been wanting for a desk.
Her veneer was totally shot, so after promising her that she would feel a whole lot better with a peel, I began her facial. I was able to pull off the really loose veneer, and then finished the job with these.
I wet the veneer in small sections with my water spray bottle, placed a moistened old rag over the dampened area and pressed it with my iron. The steam loosened the glue and I could then lift off the remaining veneer. (Although my Rowena looks pretty bad here, the brown scorch gunk did come off with a light scrubbing. In hindsight, I will look for an old iron to use for this kind of work in the future.)
After filling a cardboard box with veneer, Miss V.T was feeling and looking a whole lot better.
She had a few deep gouges that needed wood filler.
Then I gave Miss V.T. a light sanding all over to prepare her for paint.
I knew I wanted her to be white with just a tad of distressing. (This cupboard was my inspiration.)
| Photo from RSH a catalog boutique, Fall 2012 |
It took several coats of semi-gloss white to give her the coverage I wanted.
I tend to paint light, multiple coats. And I'm not particular about the brand/type of paint. For Miss V.T. I used an untinted white exterior semi-gloss found in my local hardware store's mistints. This may not be for everyone, but it works for me and my meager budget. (The paint guy had just spilled a little of the paint when he opened it to do a custom mix, and that means he couldn't use it. I happened on the scene at the crucial retail moment. A gallon of perfectly good paint for $5? Yes, please.)
It took several days of painting, drying and then a light distressing to get the look I wanted. For me it was worth the wait. I'm pretty patient, and used my work time to listen to great music and pray.
I'm really happy with the results of my vintage table makeover, and love working here with Miss V.T.
Hope you're enjoying the Fall days.
I'll be joining:
Share Your Cup at Have a Daily Cup of Mrs. Olson
Home Sweet Home at The Charm of Home
Home and Garden Thursday at A Delightsome Life
Shabbilicious Friday link party at Shabby Art Boutique
Link Party at Redoux
Tutorials, Tips and Tidbits at Stone Gable
Frugal Friday at The Shabby Nest
Craft Frenzy Friday at Craft Dictator
The Kewpie Knows
Saturday, June 22, 2013
I think I've moved at least thirty times in my life. The last time I counted it was 23 times, but that was more than eight moves ago. The first half of my relocating adult life I wouldn't let anything go and kept all memorabilia, most of which never left their original packed boxes. I hauled the boxes from state to state, town to town, house to house, and stowed them in the garage or basement until the next move. But the second half of my adult life I began to let go. Each move I whittled down the number of boxes until now all I'm taking in the way of keepsakes this time are a few things that belonged to my grandfather, and my mother's pink depression glass (which I'd show you if it wasn't packed away in the storage unit where I put it the last time I moved). I'm holding onto this kewpie doll, too. I'm keeping her (or is it him?) because #1 - he/she is vintage and in excellent condition, #2 -- it's the last thing I have from my childhood (a gift from a beloved aunt), and #3 -- I've finally matured to the point where this silly doll no longer gives me the heebee jeebees. Honestly. There's just something kind of creepy about this winking kewpie in his/her birthday suit. But maybe it's just me that thinks so. Anyway, it's finally time to grow up and stop turning this kewpie upside down, with its face away from me, before I turn out the light next to my bed. Yes, I really did that as a kid. But then I also was convinced that the lilac bush outside my bedroom window morphed into a monster at night and the only way to stop it from eating me was to hunker down under the covers and pray it didn't know I was there.
I've always had a vivid imagination. Just ask the kewpie.
What kind of things scared you when you were a kid?
Learn more about Kewpie dolls at this History Channel page: http://www.thehistorychannelclub.com/articles/articletype/articleview/articleid/1472/the-kewpie-doll
Linking up to
Subscribe to:
Posts (Atom)
Labels
Carmel
Christmas
Colorado
DIY
Fabric/Mixed Media Collage
Featured
French Country
God
Joy List Monday
Living Large In Small Spaces Series
Monday Morning Encouragement
New Year
Oregon
Random 5 Friday
Small space living
The Enchanting Cottage
Thrifting
blogging
book review
cottage
cottage decor
cottage garden
cottage gardens
cottage interior
cottage kitchen
cottage life
cottage style
craft room challenge
crafts
decorating
embroidery
faith
fall
flowers
forgiveness
garden
home design
kitchen
living room
modern
organization
painting
pet
porch
product review
quilting
recipes
shabby chic
shop
studio
summer
toile
twining
vintage